


Organise your family history
David Bradforth continues his series on genealogy...
Once you've started to collate your family history data, it's going to quickly become large and difficult to deal with unless you bring organisation to it. By organisation, I mean you devise a means by which you can quickly and easily refer to a specific set of data without having to dig through piles of paper along the way.
Using your computer, a scanner, some OCR software and an image-editing package you've pretty much got everything you need to do that. Oh and, of course, you need a genealogy package for RISC OS. This is, of course, where this article begins.
Geneology Software
In days gone by, RISC OS users had available to them a number of commercial genealogy applications; from a variety of sources.
Micro Aid from Cornwall had their Family History System, a derivative of the same program for the BBC Micro. While it offered some of the basic features necessary, and certainly was a stunning example of what could be achieved on the BBC Micro, for users of RISC OS it was simply lacking. As a single-tasking program, running in Mode 7, it didn't allow the degree of control many people had come to expect.
One of the first major genealogy applications for the Archimedes series was Ancestry, written by the late Graham Crow. Published just before the release of RISC OS 2, the first Ancestry was designed to work primarily within the Arthur operating system (which itself was severely lacking) and while it offered the majority of the functionality required at the time, the reliance upon Arthur did prove to be a major stumbling block.
In early 1997, Minerva Software were handed plans for Ancestry 2 by Graham Crow, but they chose not to adopt the original authors plans and instead appointed somebody else to write the sequel. While many efforts were made to correct faults in it, Ancestry 2 was critically panned from the moment it was released; and after a few years the program disappeared without trace.
A few years on Graham Crow decided to retake the mantle of genealogy king, and started reworking Ancestry into a new, up to date, and fully fledged genealogy suite. Unfortunately, just after the Wakefield Show at which it was announced, Graham died suddenly. Taking up the mantle, Dave Holden continued development of Ancestry but (due to Minerva Software being... well... quite stupid about things) the name had to be changed to Ancestor.
Which pretty much brings us pretty much up to date: and to where we are now. Whatever the origins of the software are, whether they're on a RISC OS computer, PC or Mac, the aim is always the same: to bring order to your genealogical data. As such, while the rest of this tutorial is focused on Ancestor, it could be applied equally to Reunion (on a Mac) or Family Tree Maker (on a PC).
Getting started with Ancestor
When Ancestor is purchased, it's supplied on CD-ROM together with a seventy-odd page manual. If you're using the trial, you've got pretty much the same thing - except electronically, and there are limitations placed upon how many entries you can have in the database. Nothing that limits you from experimenting with the program, but certainly will limit you from tracing three hundred years of your family line.
Supplied with Ancestor are two 'helper' utilities; designed to make it easier to import data from other packages.
AncConv
takes as its input files from Ancestry 1, Ancestry 2, Ancestor+ Beta versions, files from !Family by Dennis Howe and Family History System GEDCOM files; and converts them into a format usable by Ancestor. A second utility, Ged-Anc performs the same function for GEDCOM files. Why a separate utility? If the GEDCOM format is updated, it's easier to update a small component of a large program rather than to trace through a large program and see where each component is referenced.The Examples directory contains a number of databases; some large (Lincoln, RoyalFam and UKRoyalty) and others not so large (Smith). We'll be using the Smith database as a starting point for our own, as there's no better way to gain an understanding of a program such as this than experimentation.
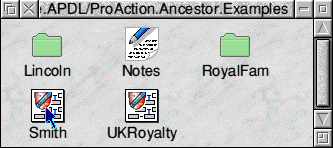
Double-click on the Smith file to open the database. The database will open, providing a screen similar to that shown below.
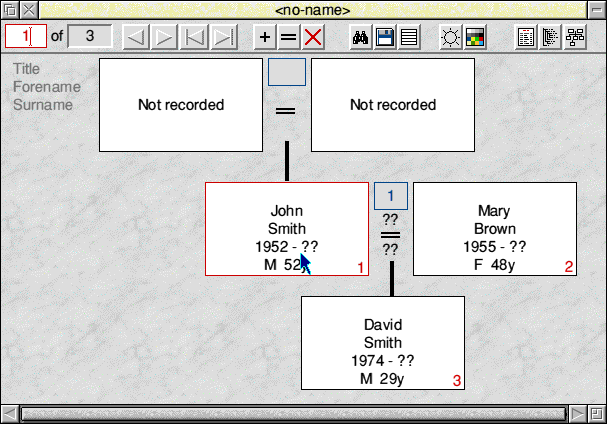
Start by adding the person you know the most about - yourself - in the position of David Smith. To do so, right-click on the entry 'David Smith'; which will then open a window within which you can edit the details given. You can also add to them - for instance to include your place of birth as well as date of birth.
When you are ready to do so, click 'Update' and the database will update, then the window closes showing your updated database. Repeat this procedure for John Smith and Mary Brown, entering the details of your own mother and father.
With these entries now in place, experiment with the functionality available. You can, at any time, click the 'chart' button (it's the furthest to the right on the button bar at the top of the screen) and, by following the usual RISC OS method, subsequently save out a Chart file; perhaps to edit it a little further within ArtWorks.
The final part of our Genealogy tutorial looks at the presentation of data; and will include a detailed overview of everything currently available (including some of the better options from the PC and Macintosh markets). We appreciate that while preparing your family tree, you may have to use other computers - and as such it's within the scope of this article to consider that.
If you've got any questions, email me - I'll be delighted to help where I can.
David.Bradforth@apdl-proaction.co.uk